
Want to know how to video record on Mac with ease? Whether you’re preparing a corporate presentation, recording a training session, or creating marketing content, your Mac offers powerful tools to get the job done. In this guide, we’ll walk you through step-by-step instructions using both Visla and Photo Booth, so you can produce professional-quality videos quickly and efficiently.
How to Video Record on Mac Using Visla
To video record on a Mac using Visla, start by downloading the Visla app from the official website. Once downloaded, install the app and open it to begin your recording process.
1. Download the Visla App: Visit the Visla website to download the application. Follow the installation prompts and open the app once the installation is complete.
2. Click on “Video Recording”: After launching Visla, locate and click on the “Video Recording” option. This action will open the recording interface, where you can start setting up your video recording.

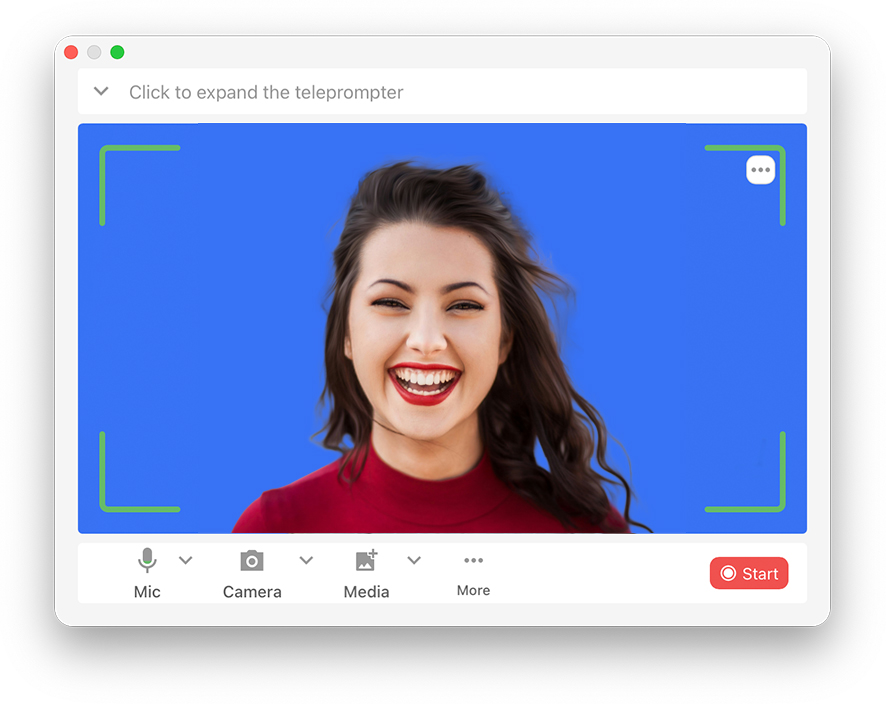
3. Adjust Your Recording Settings: Visla provides a range of settings to customize your recording experience:
- Teleprompter Setup: If you have a script, you can add it to the teleprompter within Visla, ensuring you stay on track during the recording.
- Microphone Selection: If you have multiple microphones connected to your Mac, select the one you wish to use for recording.
- Camera Selection: Choose your preferred camera from the available options. You can also add a second camera if you require multi-camera recording.
- Media Integration: You can add additional media, such as images or videos, that you want to incorporate into your recording.
- Background Options: Change the background of your recording environment to suit your needs, whether it’s a virtual background or a pre-recorded one.
4. Frame Your Shot: Position your camera and adjust the framing to ensure everything is aligned as needed. Proper framing is essential to a professional-looking video.
5. Start Recording: Once everything is set up to your satisfaction, click on the “Start” button to begin recording your video.
6. Post-Production with Visla: After recording, Visla offers robust post-production tools. Visla AI can suggest background music, automatically add B-roll footage if desired, generate subtitles, and provide a range of editing options to refine your video project.
How to Video Record on Mac
For a basic video recording process using your Mac’s built-in software, Photo Booth offers a simple solution. Here’s how you can do it:
- Open Photo Booth: Launch Photo Booth from your Applications folder or by using Spotlight search.
- Set Up Your Camera: Photo Booth will automatically activate your Mac’s built-in camera. If you have an external camera connected, you can switch to it via the “Camera” menu in the top bar.
- Adjust Your Settings: Choose the “Video” option by clicking the video camera icon in the lower-left corner of the Photo Booth window.
- Position Yourself: Ensure that you are well-framed within the camera’s view. Adjust the angle of the screen or camera if necessary.
- Start Recording: Click the red record button to begin capturing your video.
- Stop Recording: Click the stop button when you’re done. Photo Booth will automatically save your recording in the “Pictures” folder under the “Photo Booth Library.”
Why You Should Video Record on Mac
Video recording on a Mac offers a seamless and efficient experience, especially in a business or corporate setting. Macs come equipped with high-quality cameras and microphones, ensuring professional-grade recordings right out of the box. The macOS ecosystem supports a wide range of applications tailored for video recording and editing, including Visla and Photo Booth, which provide both simple and advanced features to suit different recording needs.
FAQ
To record directly from your Mac, you can use Visla, a powerful tool designed for professional video recording. Simply download Visla, open the app, and select “Video Recording” to begin. Customize your settings, such as choosing your microphone and camera, and then click “Start” to record. For basic recording, you can also use Photo Booth by selecting the video mode and hitting the record button.
Using your MacBook camera to record video is easy with Visla. After installing Visla, open the app, and select your MacBook’s built-in camera from the settings. Frame your shot, adjust any additional settings like background or media, and click “Start” to begin recording. Alternatively, you can use the Photo Booth app by selecting the video mode and starting the recording with a click.