Picture this: you’ve just hosted a killer webinar. People loved it, and the engagement was off the charts. But now what? Do you just let that goldmine of content sit there? Of course not! Editing your webinar recording can turn it into a polished piece of content that keeps working for you long after the live event ends.
Why you should record your webinars
If you’re not recording your webinars, you’re missing a huge opportunity. Recording lets you reach people who couldn’t join live, and it gives you content you can use again in your marketing. Plus, your audience can watch it again and share the best parts, which makes your webinar even more valuable and keeps it useful for longer. Think of it like this: one event, tons of ways to share and reuse, and lots of chances for people to learn from it.
Think of your webinar recording like a Swiss Army knife—it’s flexible and can help you in so many ways. Whether it’s training your team, showing off your skills, or building an on-demand content library, the options are endless.
How to Edit Your Webinar Recording
Editing your webinar recording might feel like a daunting task, but it doesn’t have to be. With the right tools and a bit of know-how, you can turn a raw recording into a polished piece of content that captivates your audience.
1. Trim unnecessary sections
No one wants to sit through awkward silences, “ums,” or technical problems. The first step in editing your webinar recording is to cut out these parts that aren’t needed. It’s like cleaning up a messy room—the good stuff stands out more when there’s no clutter.
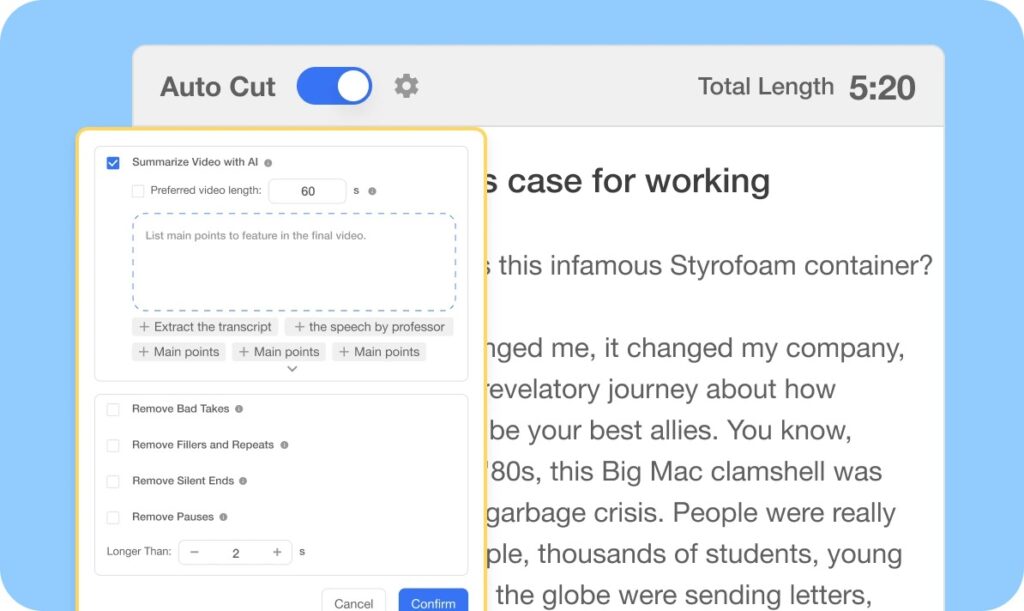
Visla’s Auto Cut tool makes this process a breeze. It automatically identifies and removes pauses, filler words, and other distractions. You just upload your recording, let the tool do its magic, and you’re left with a concise, professional video.

Pro tip: Start by reviewing your recording to mark key sections. Visla can handle the nitty-gritty, but knowing what you want to keep or cut helps streamline the process.
2. Enhance audio quality
Audio quality can make or break your webinar. Bad sound will turn viewers away faster than you can say, “Can you hear me?” Good audio makes sure your message is clear and easy to follow. No one should have to struggle to hear you—it should be simple for your audience to listen.
Visla’s lets you easily adjust the audio levels of your video. The levels of your video footage, added background music, and any voiceover elements can all be controlled separately. Crisp, clean audio keeps viewers engaged and reflects well on your brand.
Pro tip: Use headphones to review your audio edits. They’ll help you catch issues you might miss with regular speakers.
3. Add visual elements
A little visual flair goes a long way. Adding branding elements like logos, colors, or watermarks makes your webinar look polished and professional. It also helps people recognize your brand—they’ll see your colors and logos and think of your company.
Visla’s Branding feature makes it simple to integrate these elements into your recording. You can add intro and outro slides, overlay your logo, or even customize fonts and colors to match your style.
Pro tip: Don’t go overboard. Keep your visuals consistent and professional. Too many elements can distract from your message.
4. Choose the right video editing software
The tools you use can make a big difference in your editing experience. You don’t need fancy Hollywood software, but you do need something that’s easy to use and gets the job done. The goal is to create a webinar that’s easy to watch and looks professional without needing to be a movie expert.
Visla’s Scene-Based Editing tool is a game-changer. It lets you focus on specific parts of your recording, so you can rearrange, refine, or enhance individual sections without affecting the whole video. This level of control makes it easier to tell a clear, compelling story.

Pro tip: Organize your content into scenes or chapters before you start editing. This helps you stay focused and makes the editing process smoother.
5. Add background music and graphics
Background music and graphics can add personality to your webinar recording. A subtle background track makes the video more engaging, and well-placed graphics help highlight key points. The idea is to make the video fun to watch without overwhelming your audience.
Visla’s tools make it easy to enhance your recording:
- Use the Background Music feature to select from a library of tracks or upload your own. Just make sure the volume complements your audio, not overpowers it.
- Add shapes, arrows, or emojis with the Graphics feature to highlight important information and keep your audience’s attention.
Pro tip: Use graphics sparingly to avoid clutter. Keep the focus on your content, not the extras.
6. Final touches: review and export
Before you finish, review your entire recording from start to finish. Look for any mistakes or spots that could be improved. Check the transitions, audio, and visuals. Make sure everything flows smoothly from one part to the next so your audience has a great experience from beginning to end.
When you’re happy with the final product, export it in a format that works for your platform. Whether you’re uploading to YouTube, adding it to your website, or sharing it on social media, make sure the quality is right for your audience. A high-quality video shows you care about your content—and your viewers will notice that.
Why Edit Your Webinar Recording?
A webinar recording is full of great content, but it’s rarely perfect right away. Cutting out the boring parts, improving the audio, and adding visuals can make your video much more interesting for viewers.
A polished recording also makes your brand look more professional and helps make sure your message gets across the way you want. Think of it like this: you’ve already worked hard to make great content; editing just helps it look and sound even better.
What to do with a webinar recording
Now that you’ve got your webinar recorded and edited, it’s time to make it work for you. Here’s how to turn that one recording into a powerhouse of content.
1. Offer on-demand access
Make your webinar available on-demand by hosting it on your website or YouTube. This not only makes it last longer but also helps new audiences find your content. On-demand webinars are great because they let people watch whenever it’s convenient for them.
Add timestamps so viewers can jump to the sections they want. If someone only cares about a particular topic, they’ll appreciate not having to watch the entire recording to find it.
2. Create blog posts
Webinars are full of useful information, and blogs are a great way to break it down for people who’d rather read than watch. Pull out the key points, turn them into easy-to-read sections, and you’ve got a blog post. Plus, it’s a great way to boost your website’s SEO.
For example, if your webinar was about marketing tips, write a blog titled “5 Marketing Tips That Actually Work.” Link back to the webinar or embed it, so people have another way to engage with your content.
3. Develop short video clips
Social media loves short content. Edit your webinar into quick, attention-grabbing clips and share them on Instagram, LinkedIn, or TikTok. These short clips can show off the best parts of your webinar or give a taste of the full video. They’re also more likely to get shared, which means more exposure for your content.
4. Produce a podcast episode
Your webinar’s audio can also be used for a podcast. Podcasts let you reach a whole new group of people—commuters, gym-goers, and anyone who likes to listen instead of watch. Extract the audio, clean it up, and upload it to podcast platforms with a catchy title like, “How to Boost Your Business in 30 Minutes.” It’s an easy way to get your content out to even more people.
5. Share on social media
Break your webinar into quotes, stats, or quick tips and share them on social media. A well-designed graphic with a great quote can do really well on Instagram or Twitter. It keeps your audience interested and curious about the full webinar. The more ways you can repurpose the content, the more value you get from that one webinar.

